Architecture, Configuration, and Validation Guide
Overview
Trustifi’s Outbound Email Relay enables organizations using Microsoft Exchange on-premises to route outbound email through Trustifi’s secure infrastructure. This allows organizations to apply Trustifi’s encryption, Data Loss Prevention (DLP), tracking, and policy enforcement to outbound messages while continuing to operate within their existing Exchange environment.
In this architecture, Exchange sends outbound mail to Trustifi’s secure SMTP relay. Trustifi processes the message according to your configured policies and then delivers it to the external recipient. Internal email remains within your organization and does not traverse the Trustifi relay.
The purpose of this instruction manual is to help you complete the configuration of the Trustifi Outbound Email Relay on a Microsoft Exchange on-premises server.
This manual contains the requirements, procedure descriptions, screenshots, usage expectations, and validation steps for Trustifi Email Relay.
Please follow each step provided and read all warning notes.
Notes regarding on-premises environments
Due to limitations in Exchange, the configuration of the Email Relay for on-premises environments will always apply to all senders. There is no option to specify which senders or groups should be connected to the Email Relay.
We recommend performing this integration along with a member of our support team. To contact us, please complete the Email Relay questionnaire and contact us at [email protected].
Instructions and screenshots in the following guide are taken from Microsoft Exchange Server 2016. Other versions of Exchange Server may appear and behave differently, but the overall configuration approach remains the same.
Requirements
To configure your email environment to work with Trustifi Email Relay you must have the following:
Microsoft Exchange Server version 2013 or newer
An administrative account with permissions for the Microsoft Exchange admin center
A Trustifi account with admin permissions
Administrator access to the DNS management system for your domain
Configuration
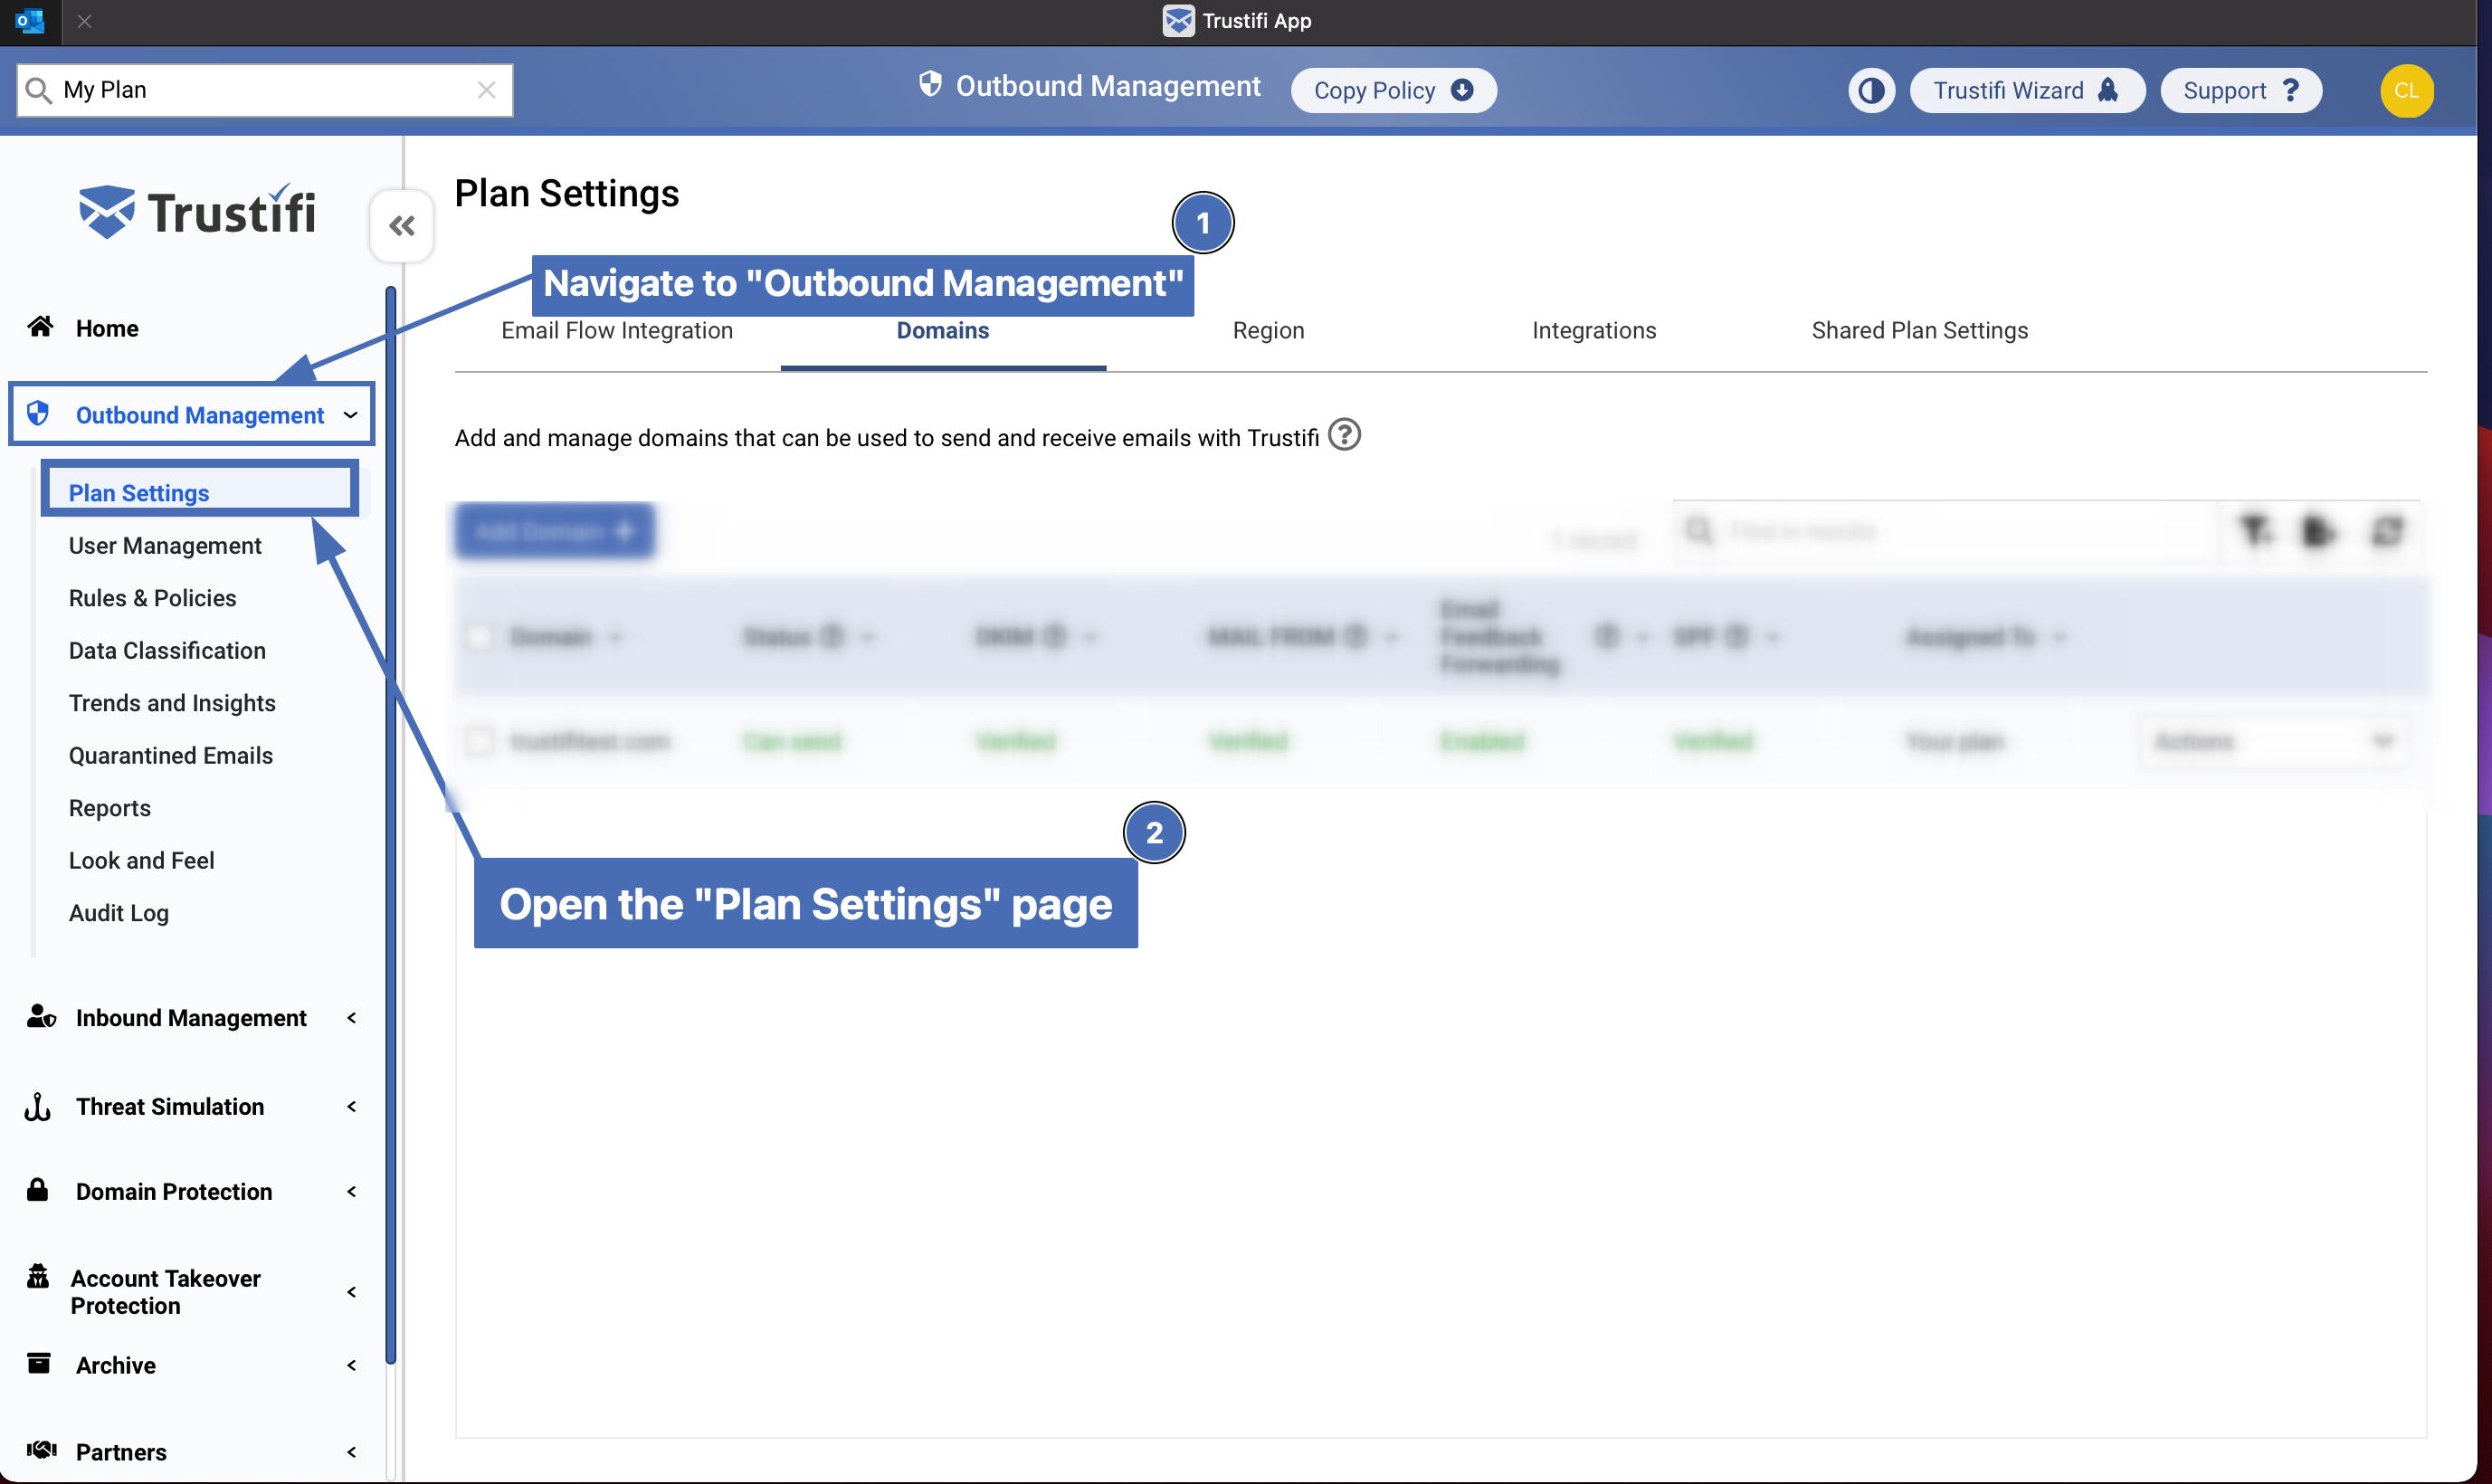
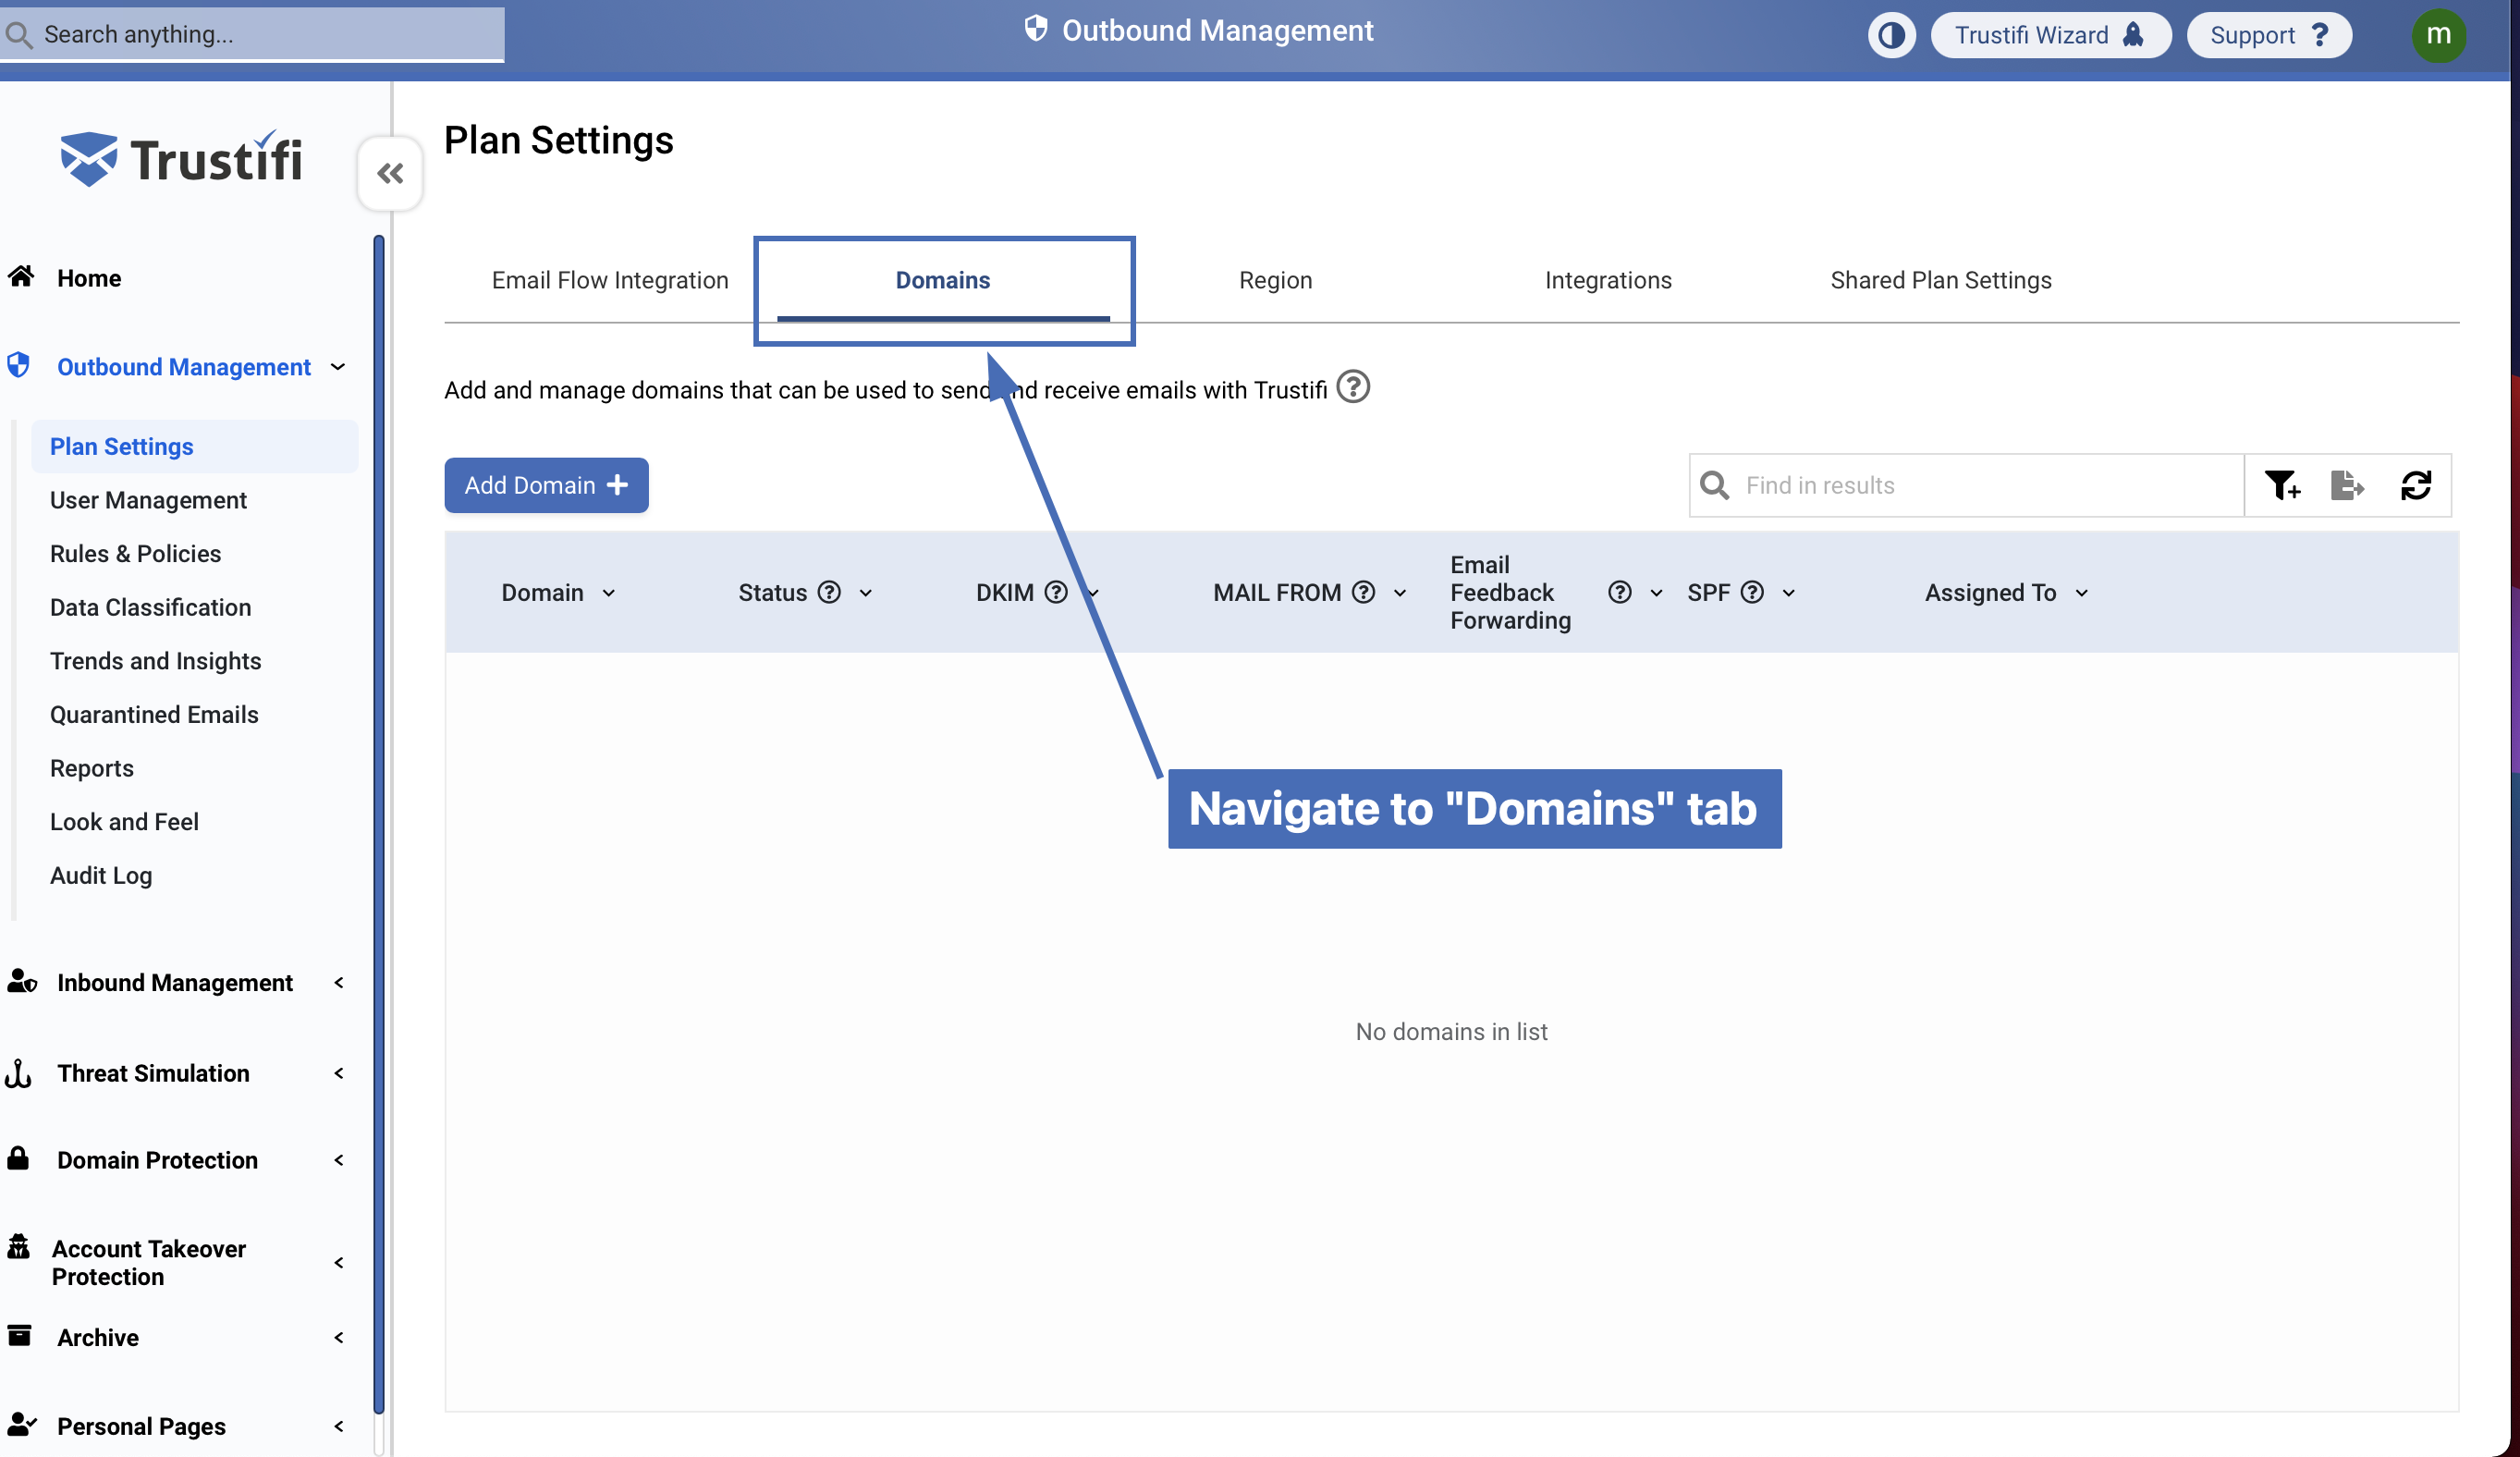
Step 1: Navigating to the Domains tab
In the Trustifi portal navigate to the Domains page (Outbound Management > Plan Settings > Domains).
Adding a new domain
This is a quick overview of the domain verification process. To view the full guide, visit:
https://docs.trustifi.com/docs/domain-verification
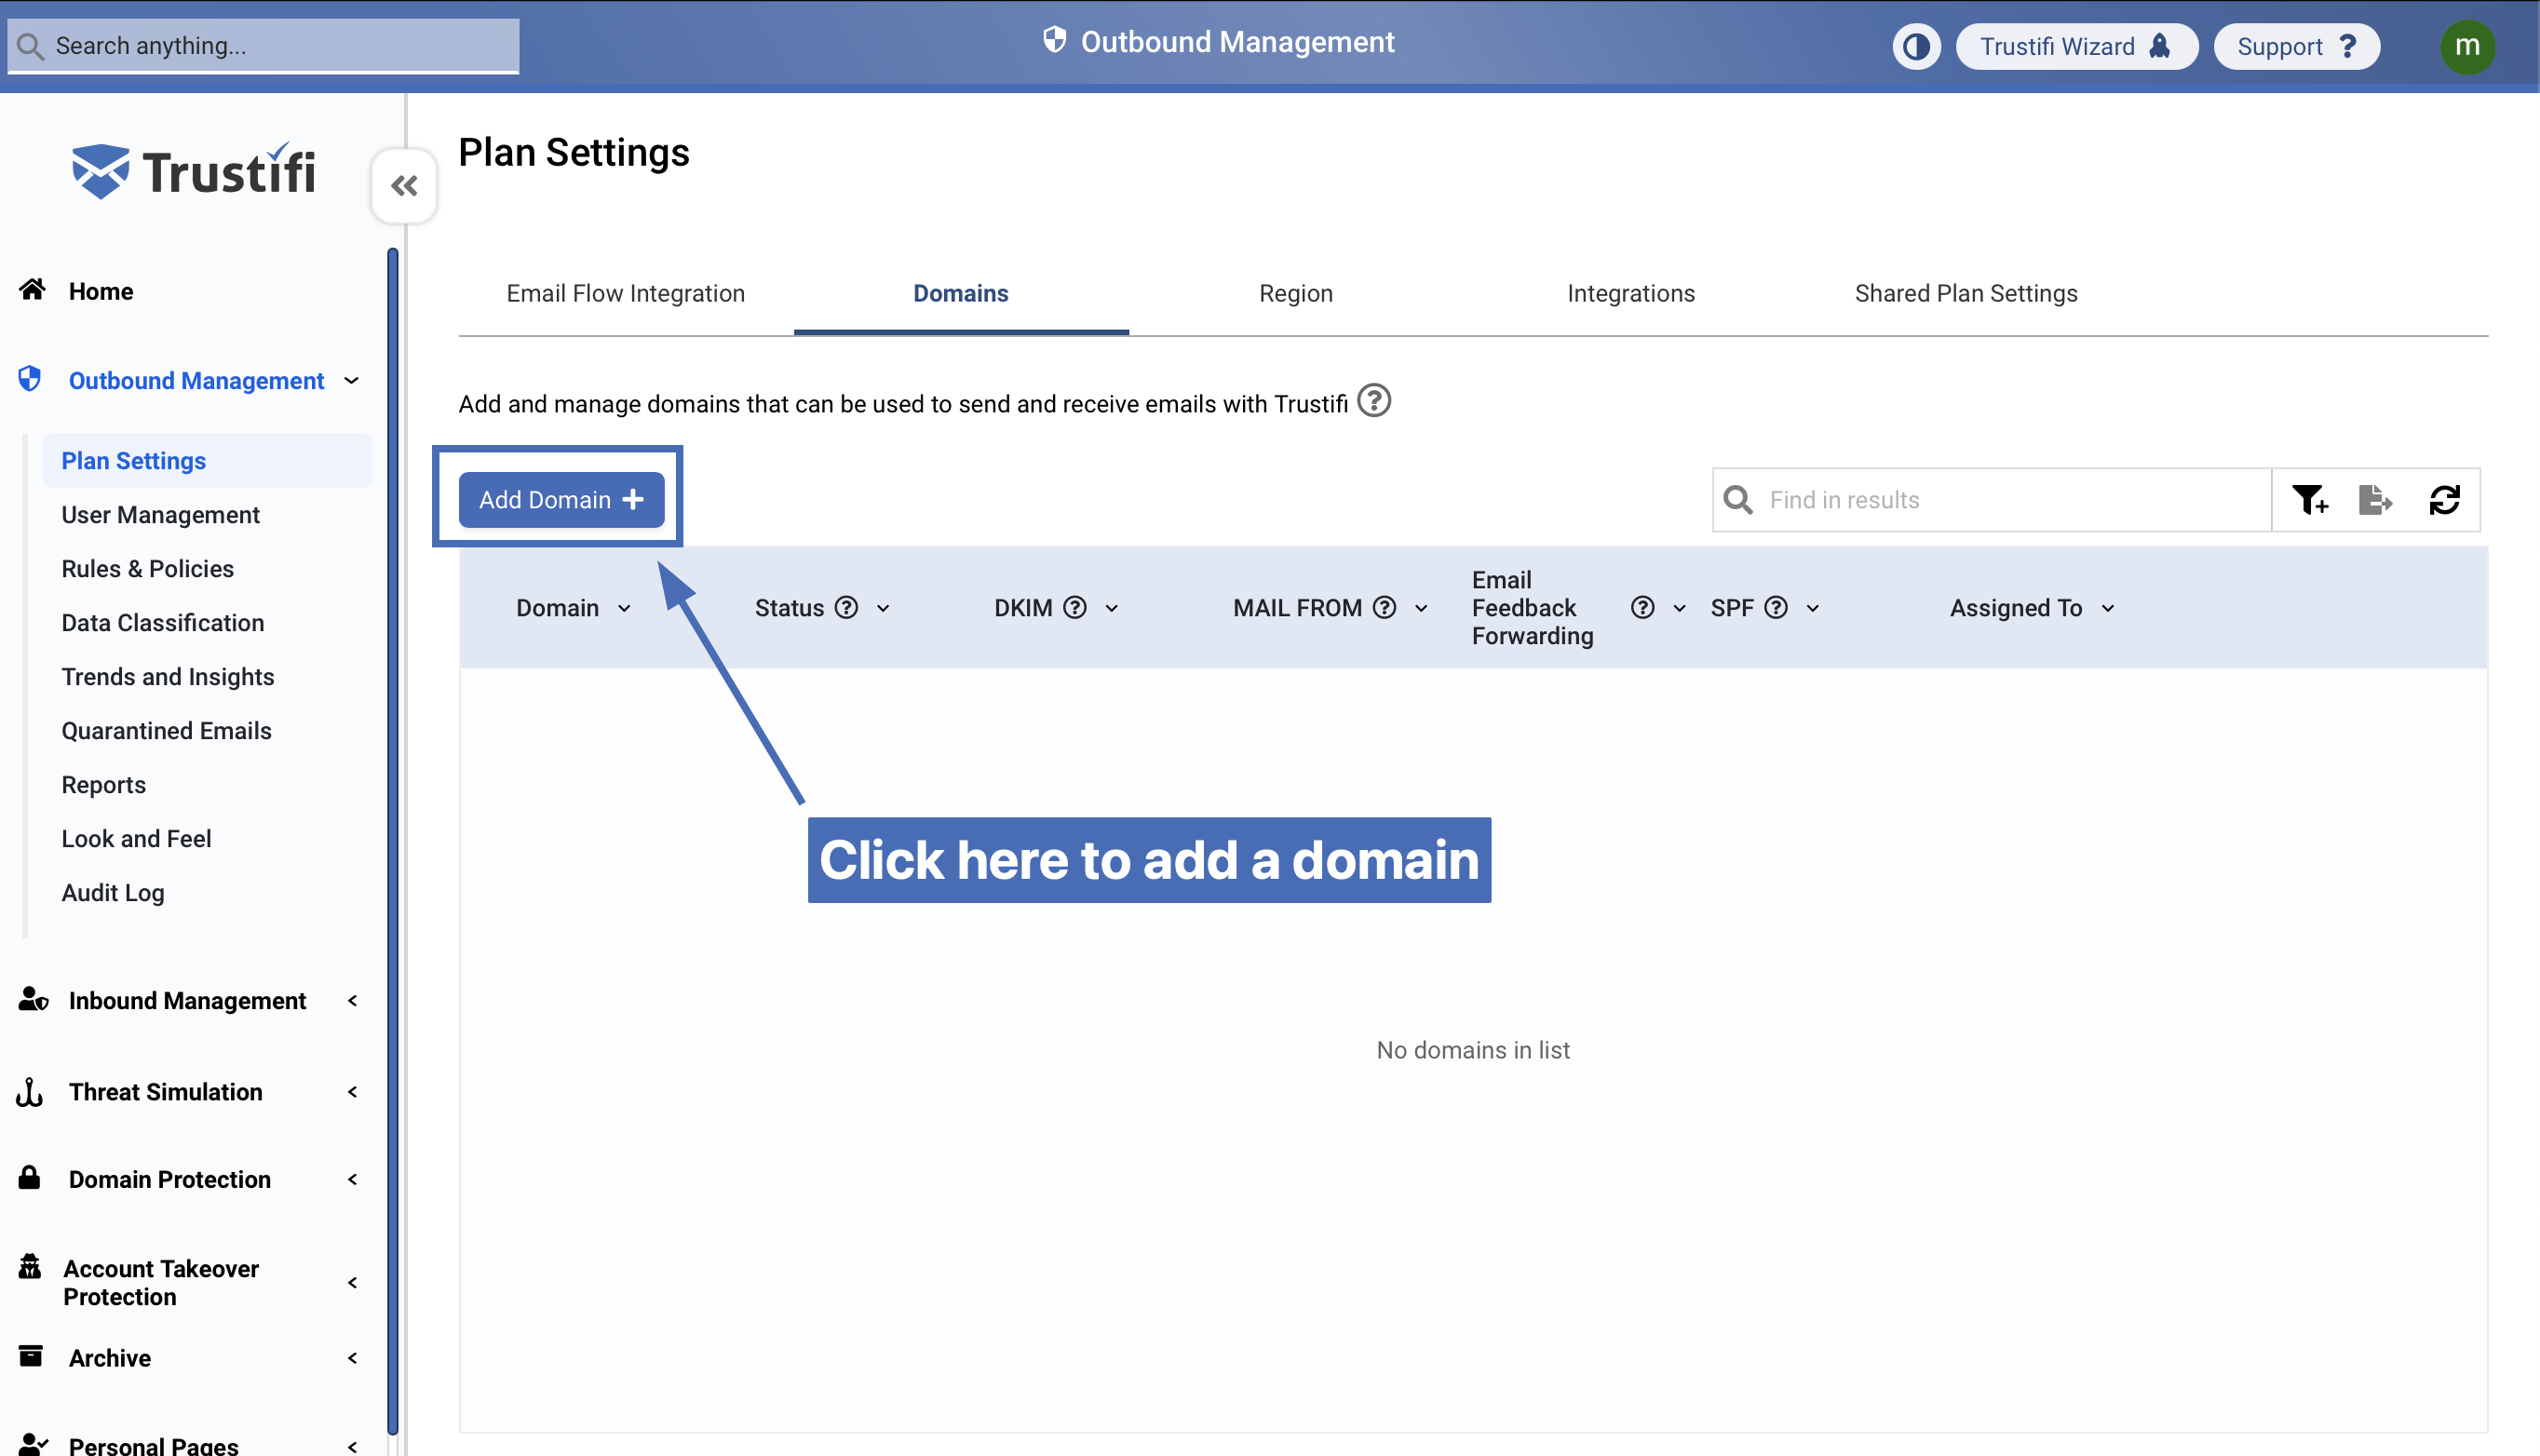
Step 2: Adding a new domain
Now, you will need to add the domain used to send emails. Click on Add Domain.
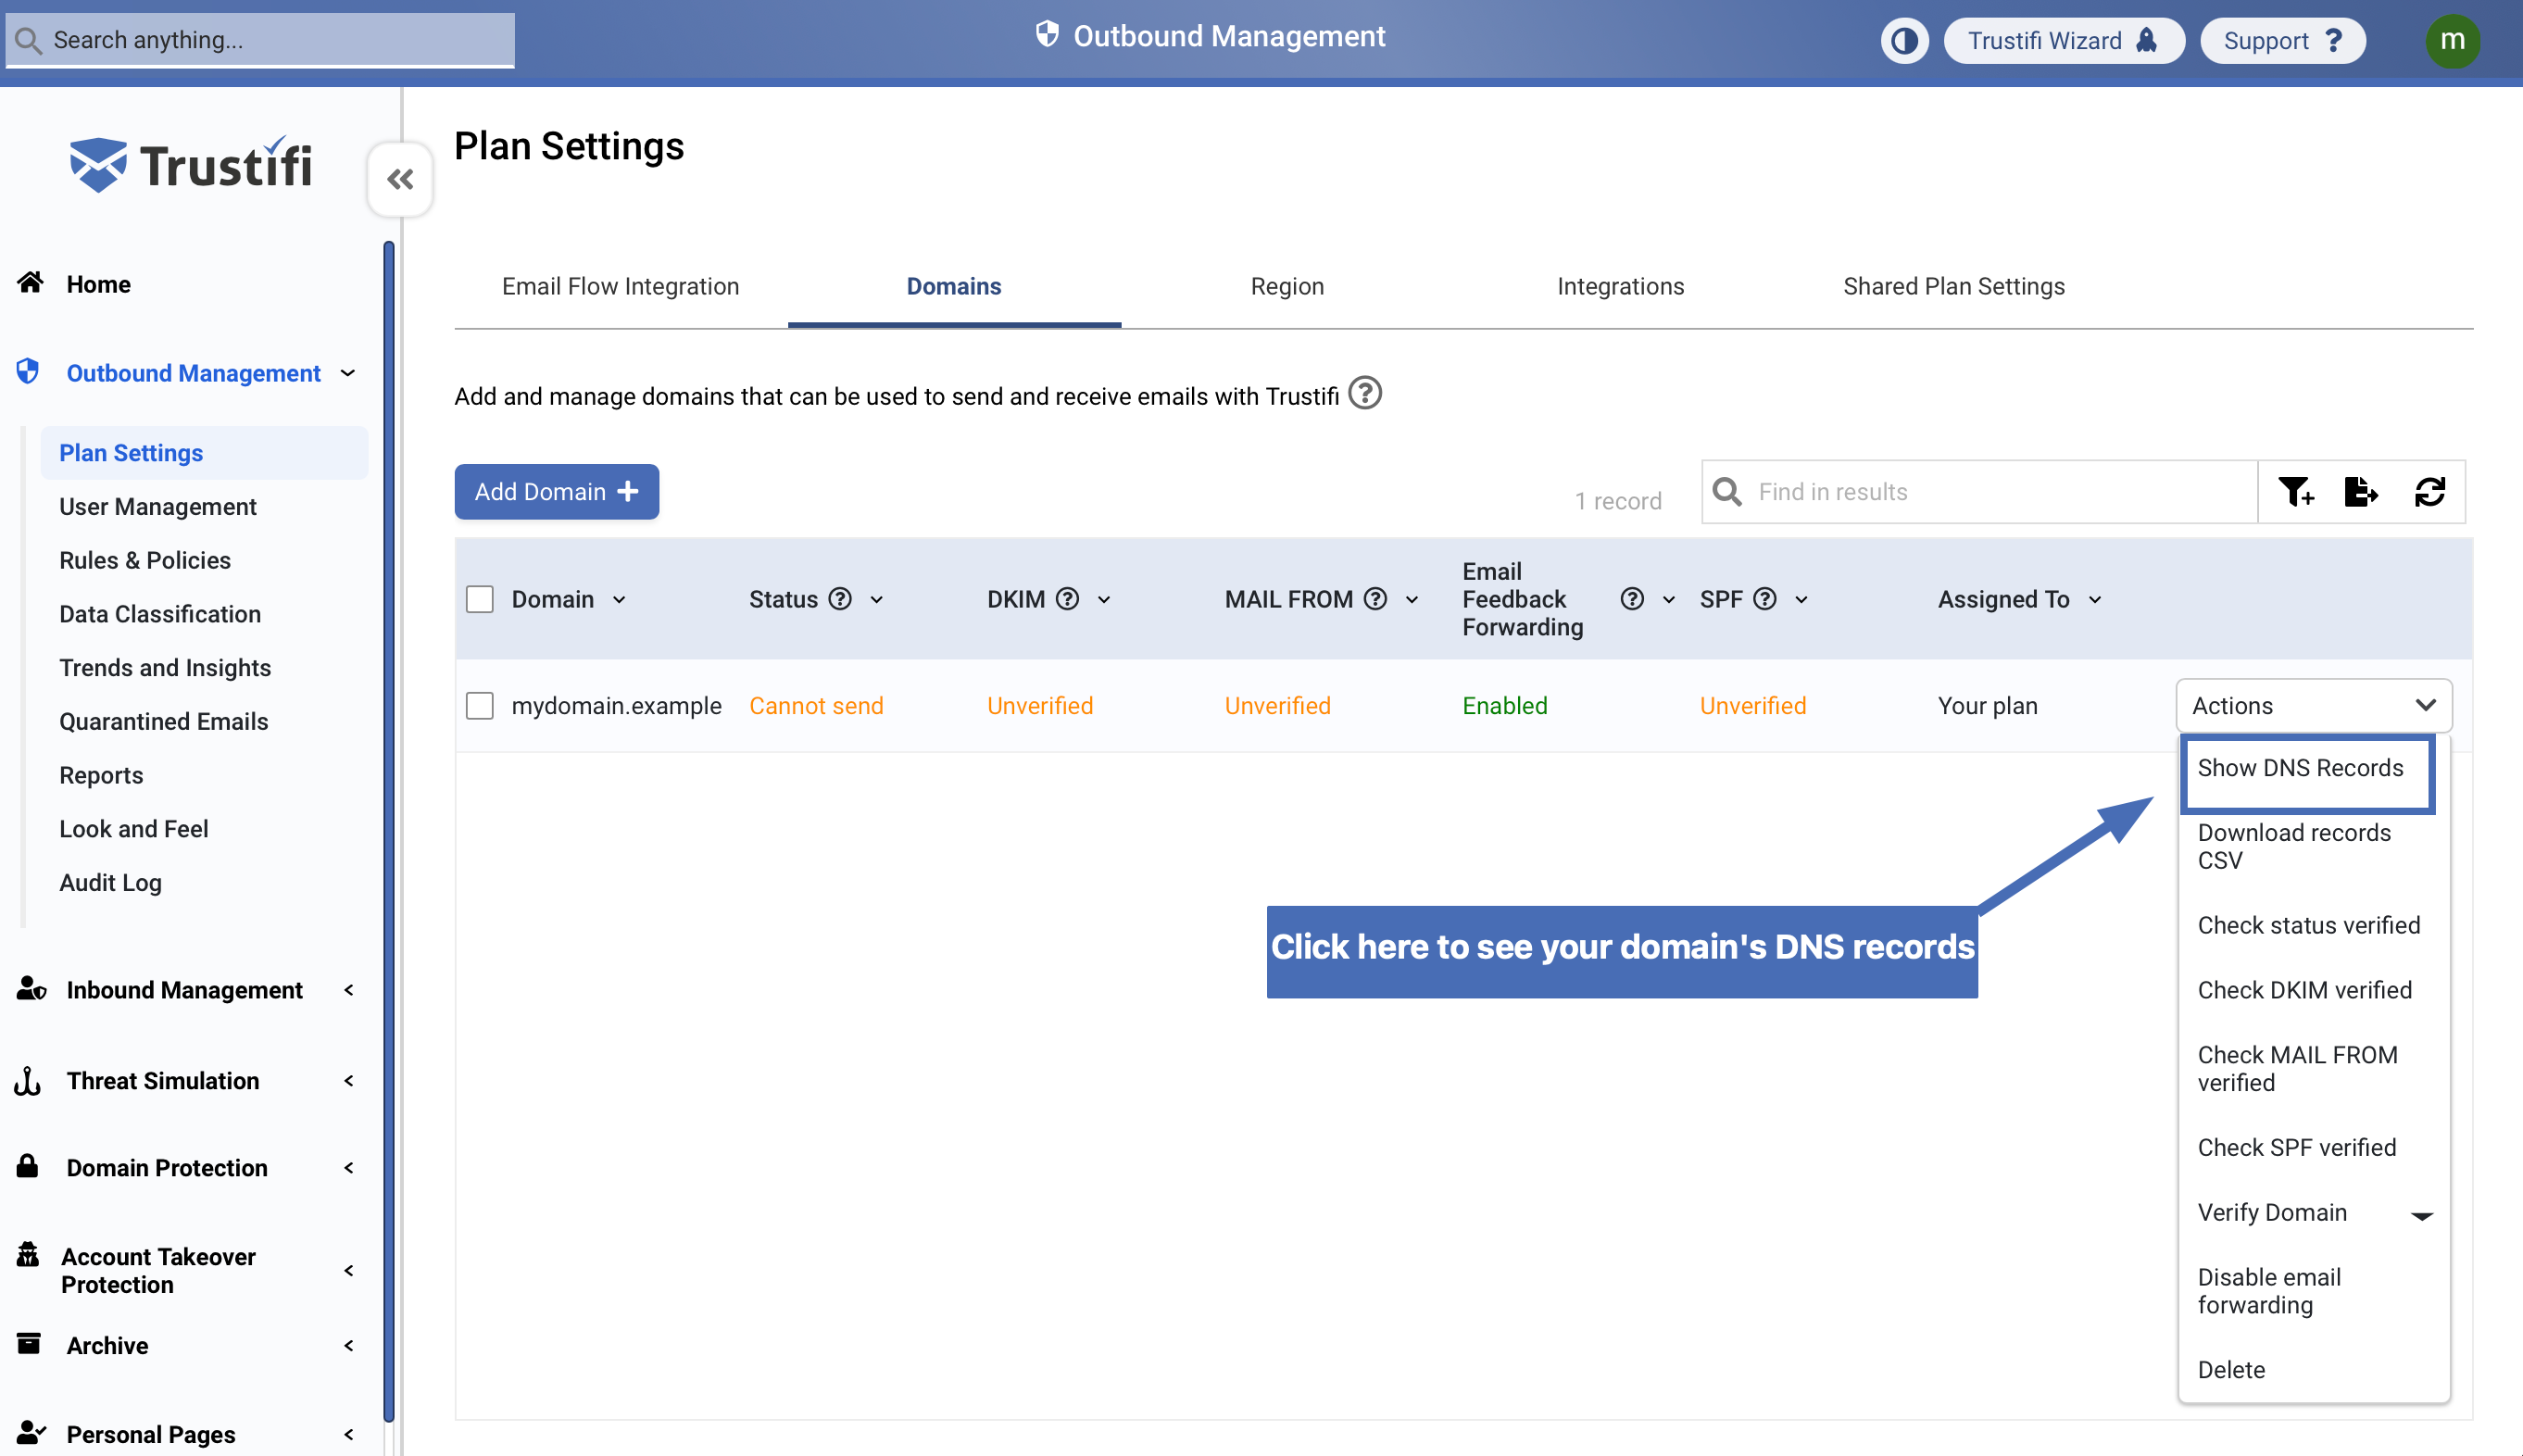
Step 3: Verifying the domain
After adding the domain, copy and import the required DNS records to your DNS provider, for example DNS Made Easy or GoDaddy.
Note: You can also click Download records CSV from the Actions menu to save these records as a CSV file.
Step 4: Checking verification status
After you have added all the DNS records to your domain, click Check if verified to see if the status changes to Verified.
Continue only if the domain has been verified.
Note: Depending on your DNS system, records may take up to 24 hours to propagate.
.png)
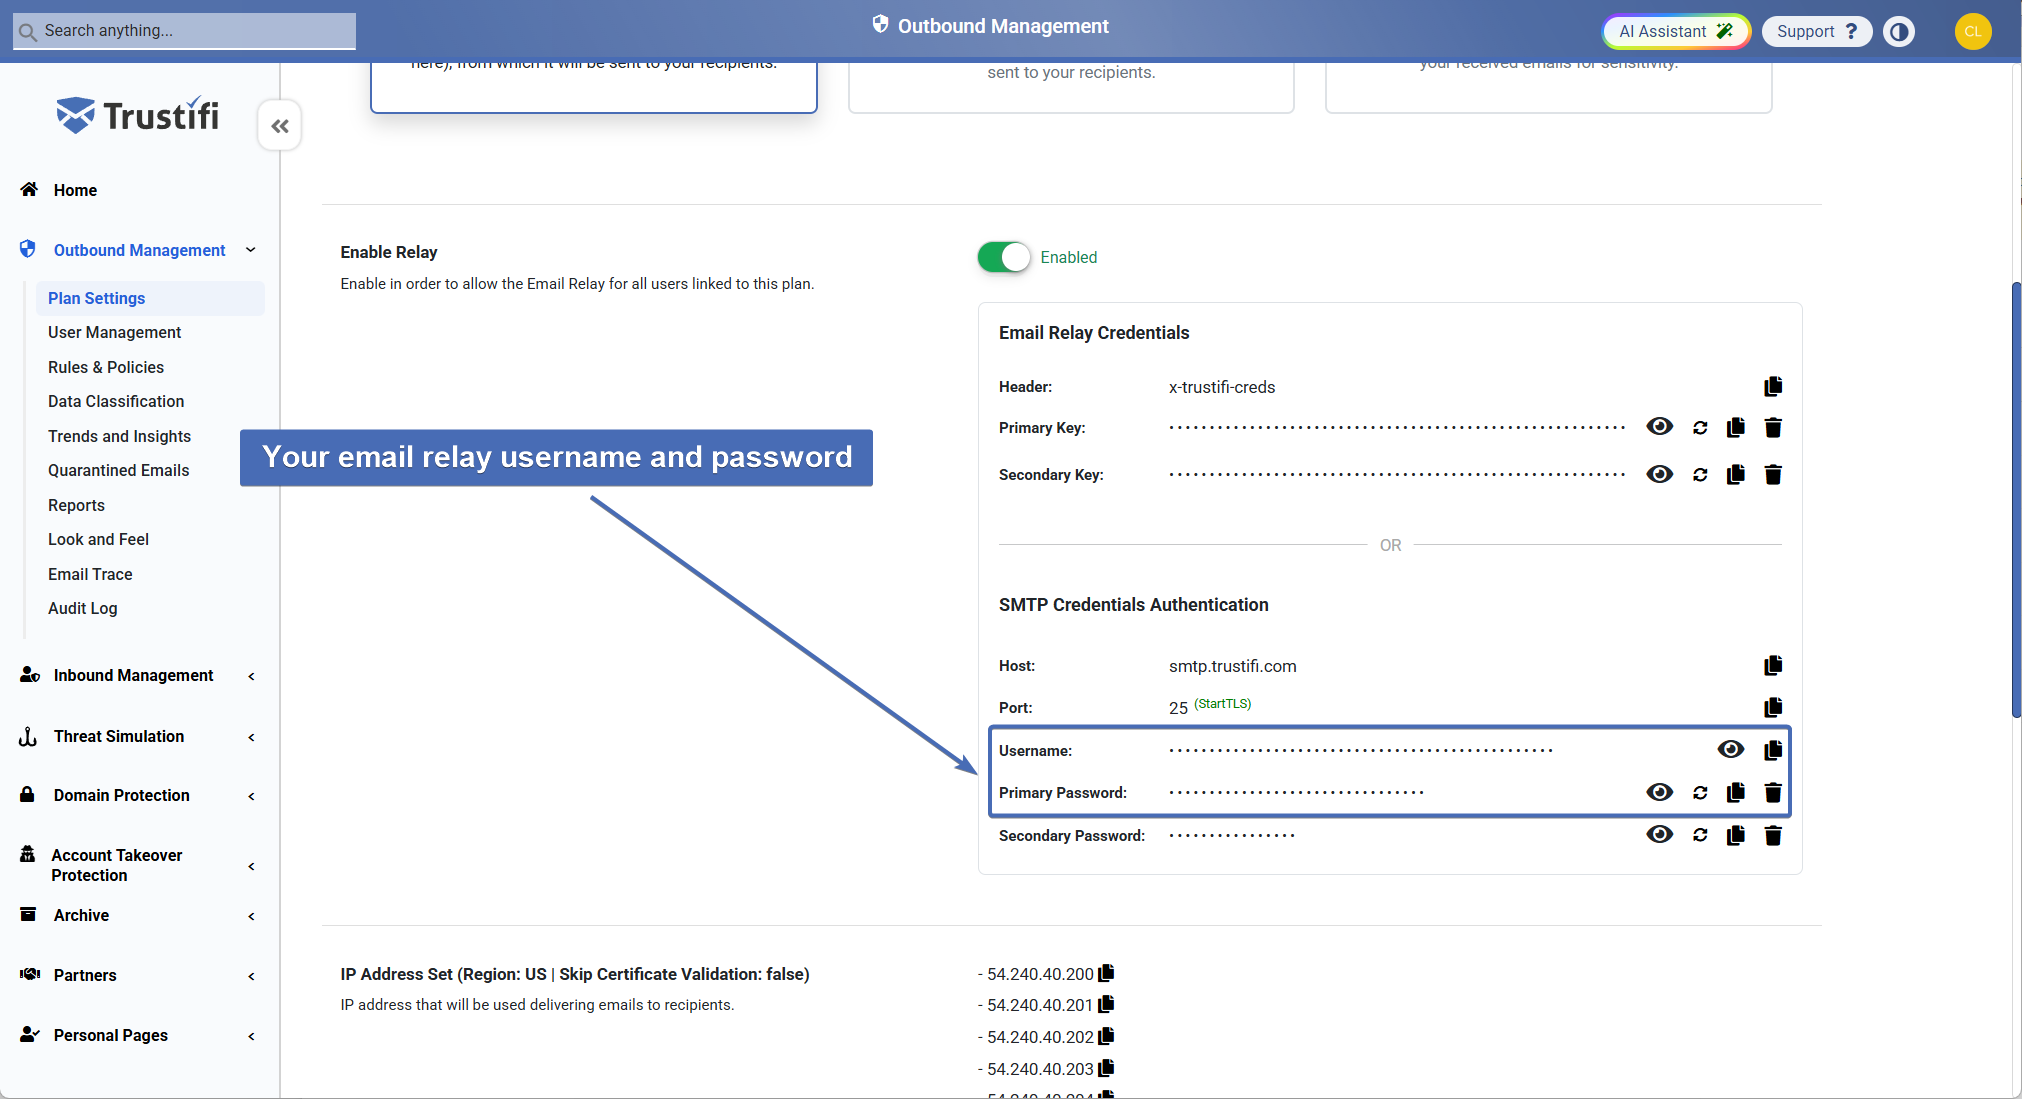
Step 5: Enabling and generating the Email Relay secret key
Navigate to Plan Settings then Email Flow Integration.
Click the toggle to Enable Email Relay.
.png)
After enabling, your credentials will be generated under SMTP Credentials Authentication.
Copy the username and password using the copy buttons, as these will be needed in Exchange configuration.
Step 6: Navigating to Mail Flow Connectors
Log into your Exchange admin center using your admin credentials
Navigate to the "Mail flow" section in the left sidebar
Open the "Connectors" tab
Click on the "+" sign to add a new connector
.png)
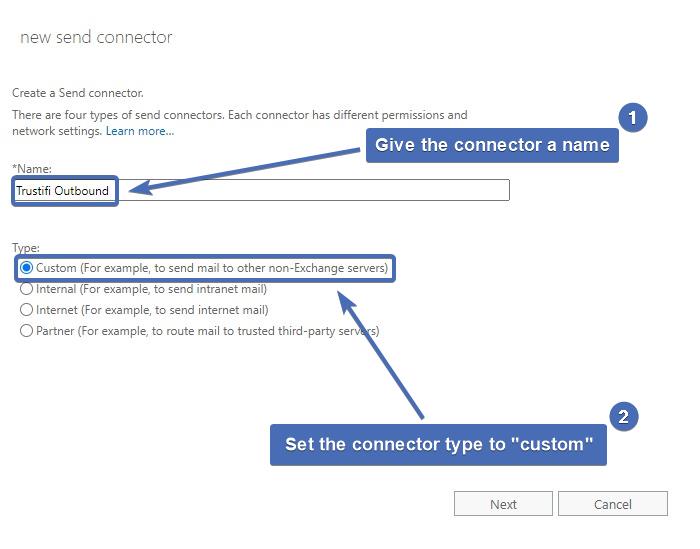
Step 7: Setting the connector’s name and type
Give the connector a meaningful name, for example: “Trustifi Outbound”.
Set the connector type to “Custom” and click “Next” to continue.
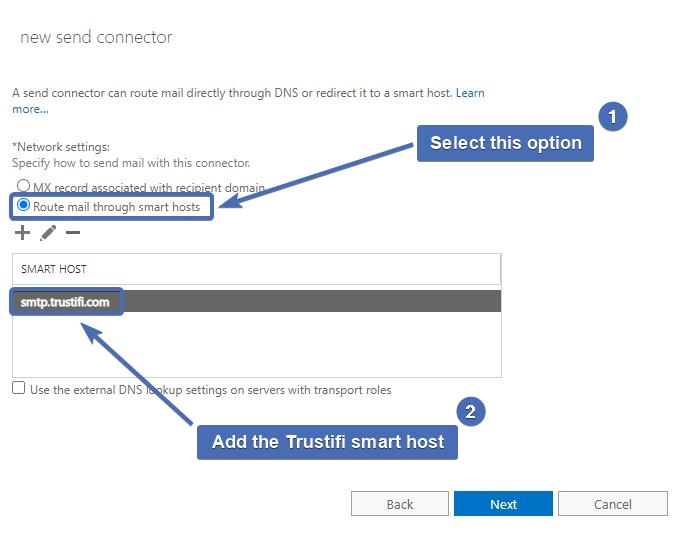
Step 8: Selecting routing type
Select "Route mail through smart hosts"
Click the "+" sign to add a smart host
Enter the Trustifi smart host address: smtp.trustifi.com
Click "OK" to confirm
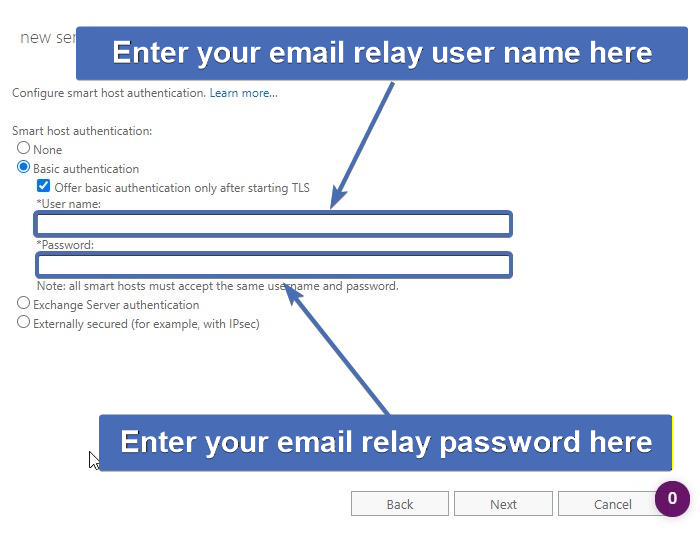
Step 9: Configuring smart host’s authentication
Select Basic authentication.
Check Offer basic authentication only after starting TLS.
Enter the username and password copied from Step 6 in Trustifi.
Click Next.
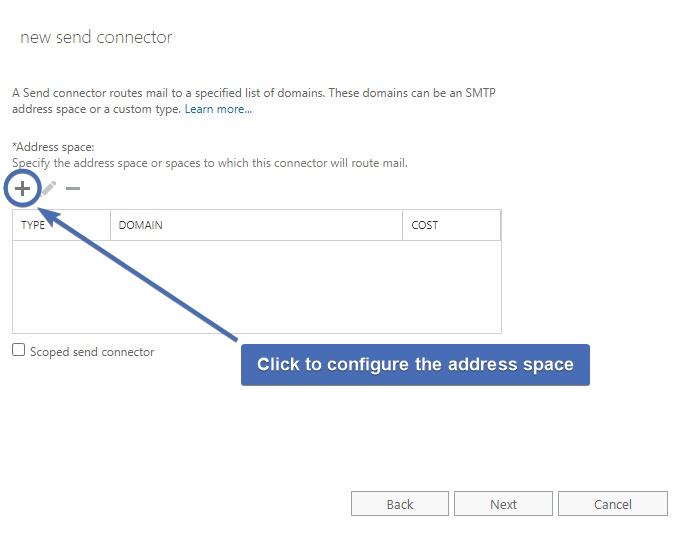
Step 10: Setting the address space
The “Address space” dictates which domains should be used to send emails through this send connector.
To configure the address space, click on the “+” sign.
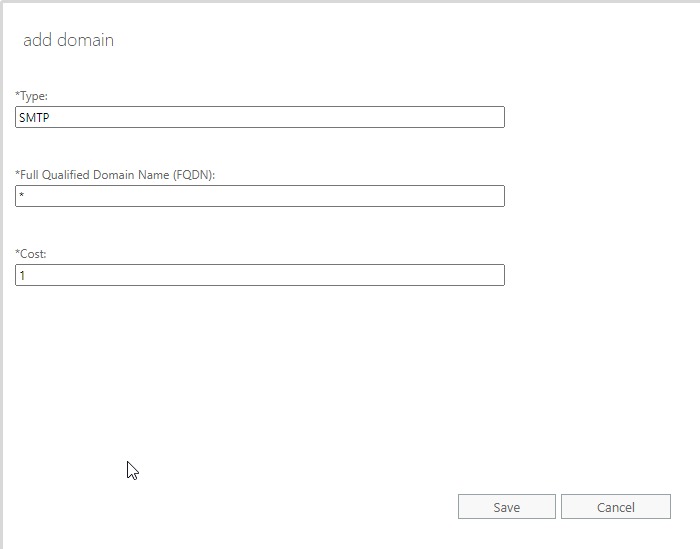
Step 11: Configuring the address space
In the new window, set Type to SMTP
Set “Full Qualified Domain Name (FQDN)“ to asterisk symbol (*) which means this will apply to all domains
Set Cost to 1
Click "Save"
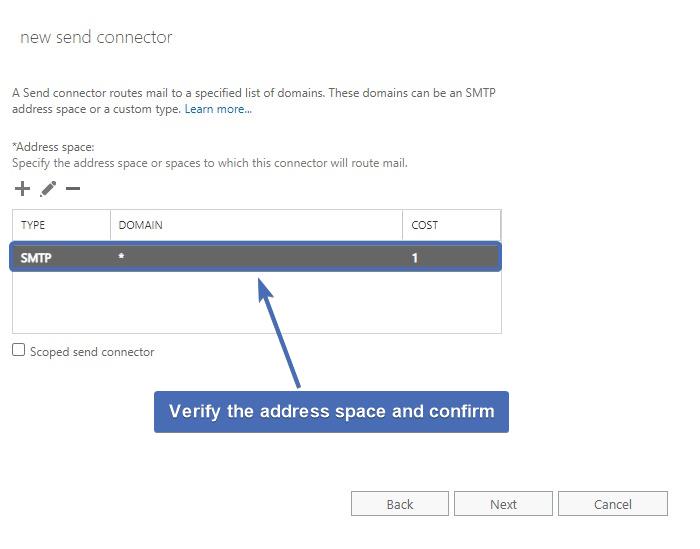
Step 12: Confirming address space
Confirm the address space has been configured according to the instructions above and click “Next” to continue.
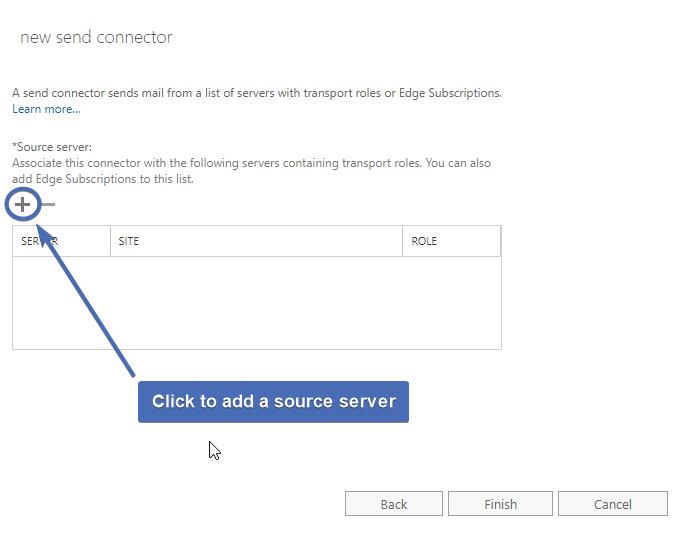
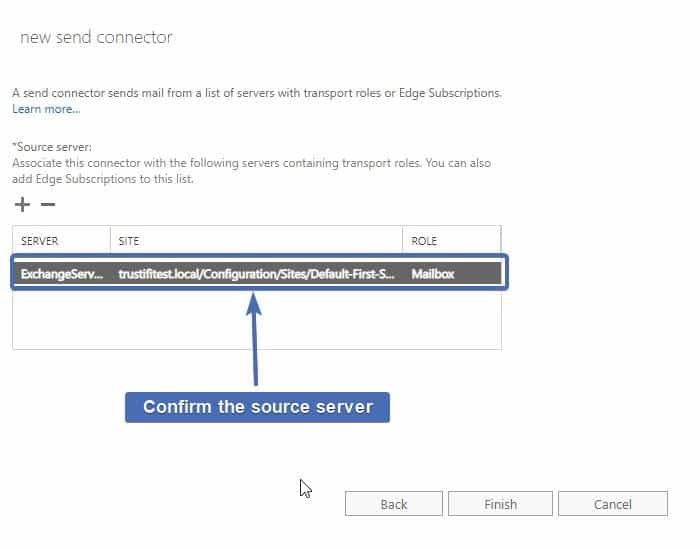
Step 13: Adding a source server
Now you will need to specify the source server for this send connector.
To add a source server, click on the “+” icon.
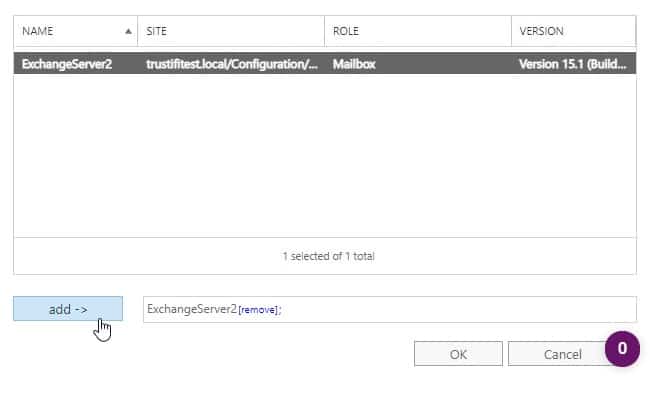
Step 14: Selecting a source server
Select the relevant source server for this send connector and click “Add”.
When finished, click “OK” to continue.
Step 15: Verifying and finishing
Verify the selected source server is correct and click “Finish” to create the send connector.
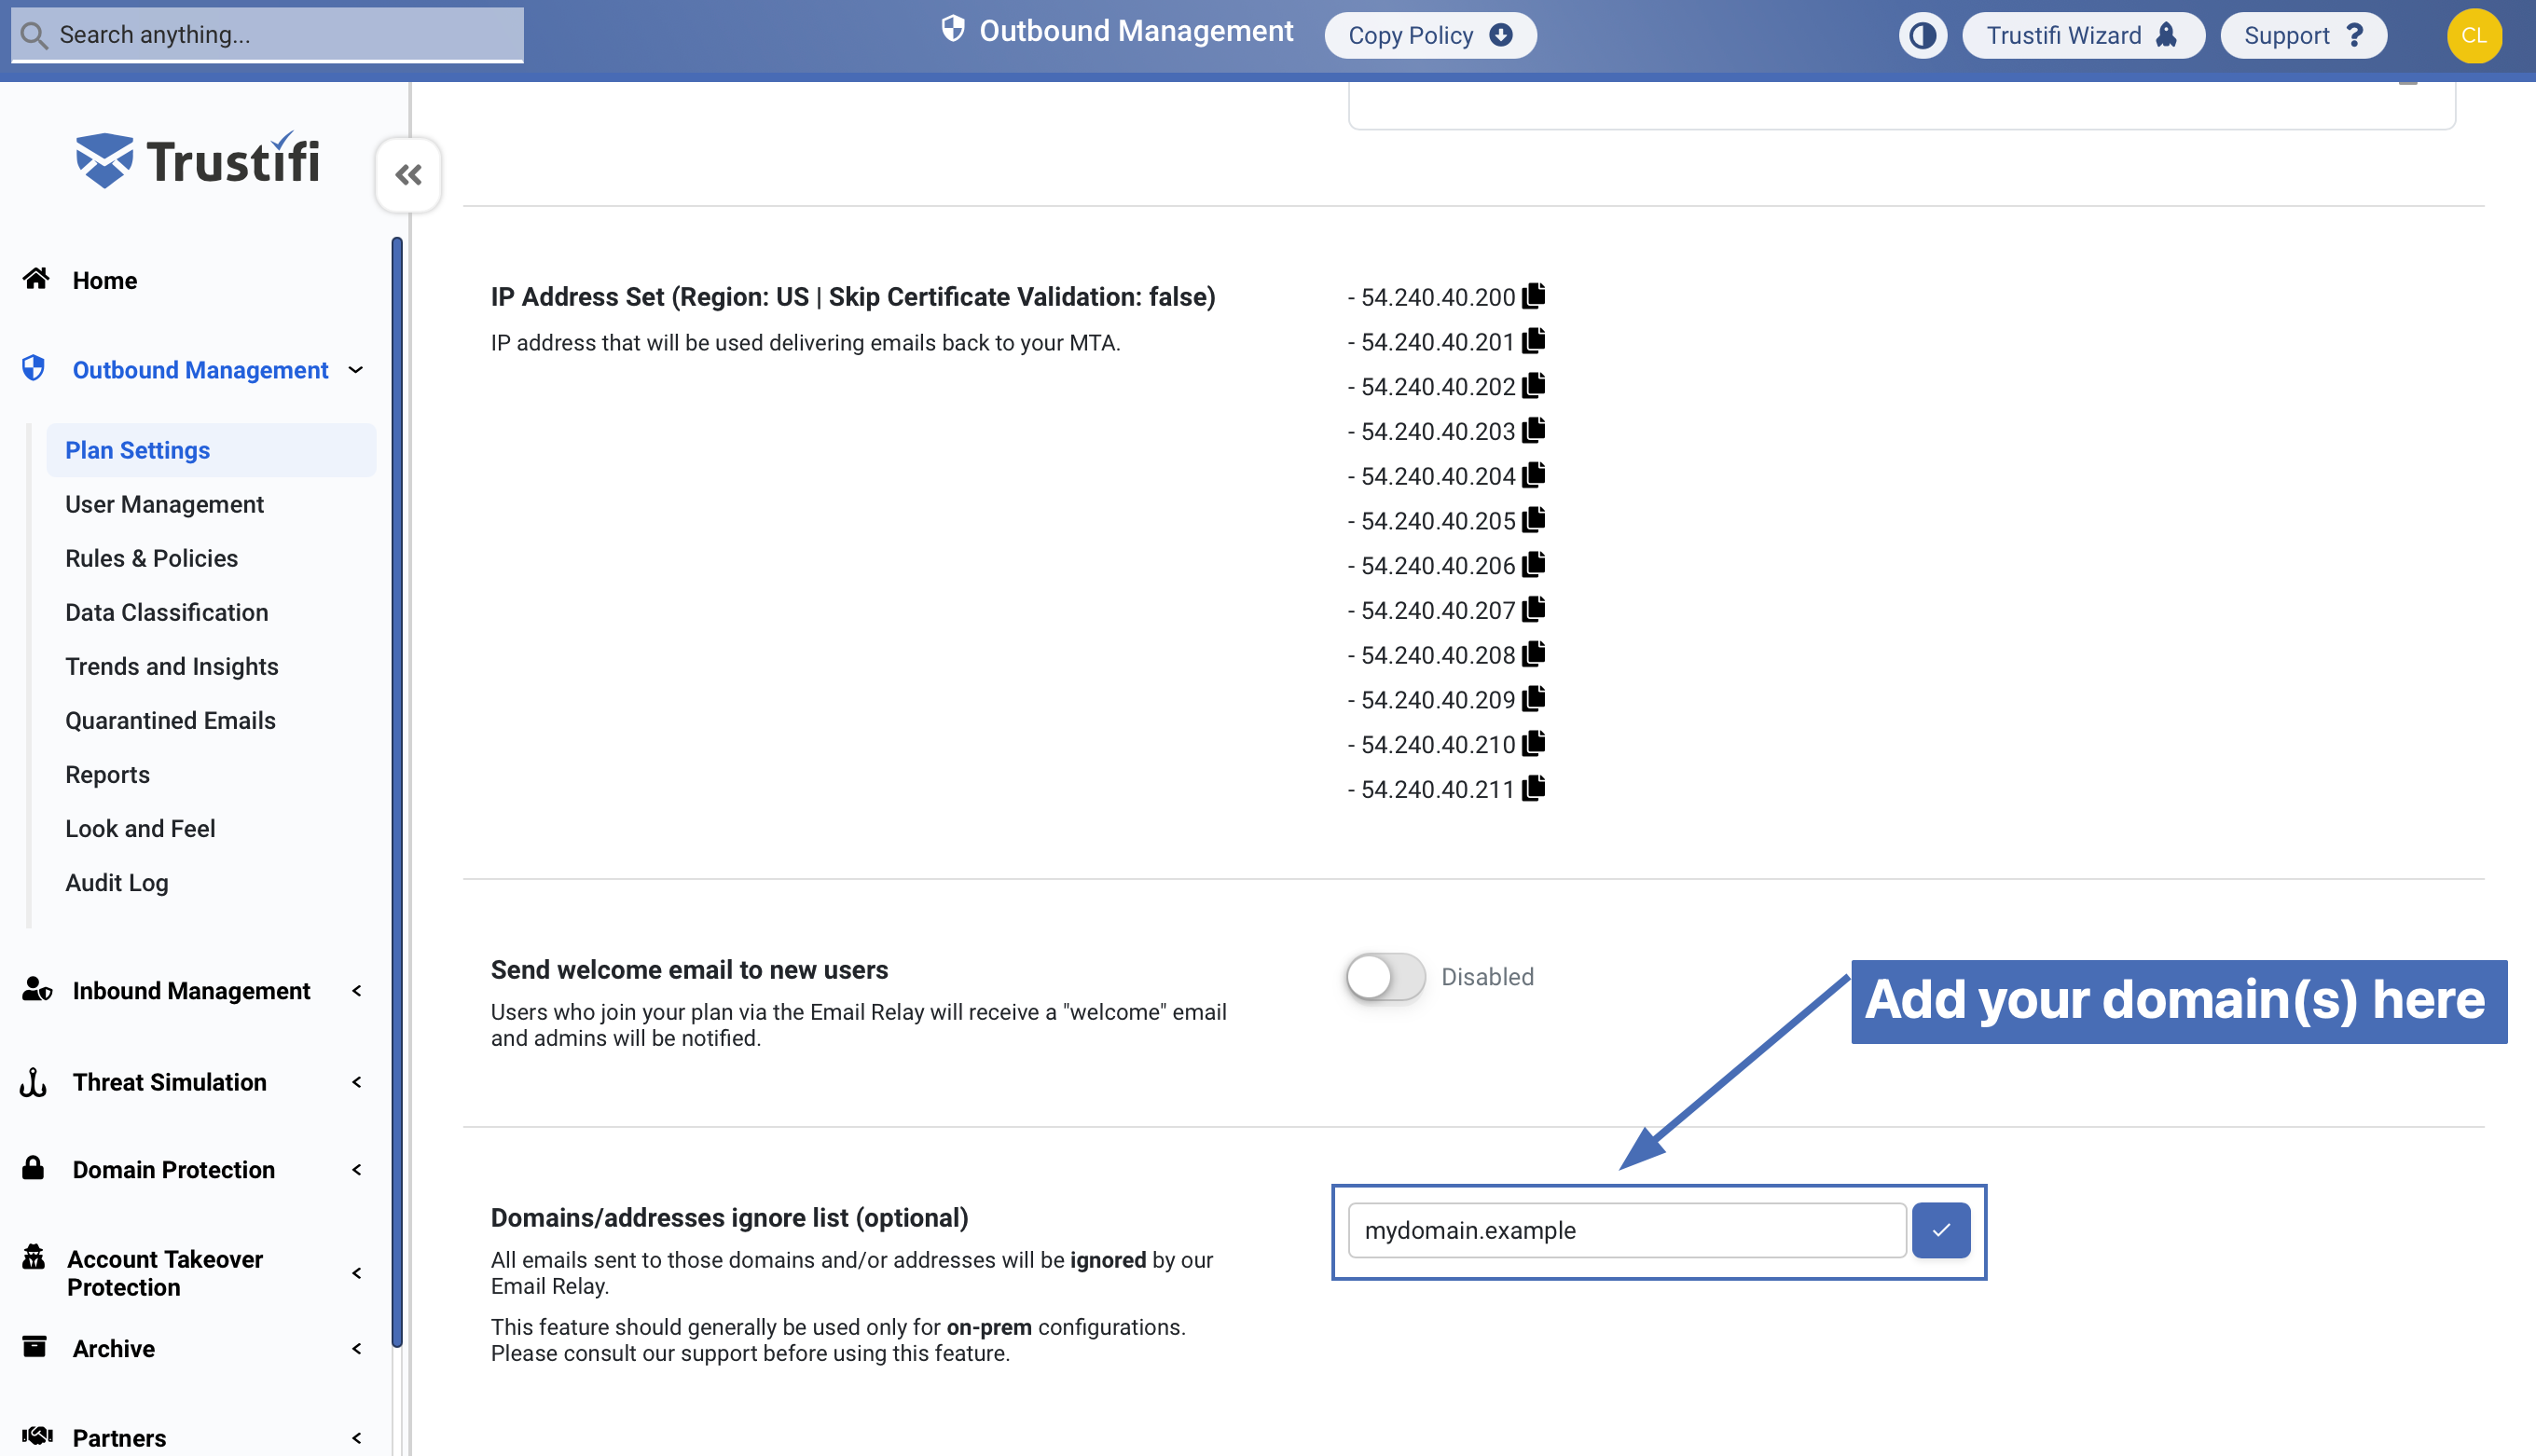
Step 16: Adding domain(s) to Trustifi ignore list
To avoid duplications and other mail flow issues with internal emails, an exception needs to be set up in Trustifi for internal emails.
Navigate to the Email Flow Integrations tab (Outbound Management > Plan Settings > Email Flow Integration) tab in the Trustifi admin portal. Scroll down to the "Domains or addresses ignore list" section and add your domain(s) to this list.
This will ensure your internal emails are always delivered directly without going through the Email Relay.
Testing
Test 1: Sending an external email
Preconditions: Outbound Email Relay integration completed as instructed above.
Test: Send an email from an internal mailbox to an external recipient, such as Gmail.
Expected result:
Recipient receives the email normally
No significant delay
Email does not land in spam
Sender can view tracking in Sent Emails in Trustifi
Test 2: Sending an internal email
Preconditions: Outbound Email Relay integration completed as instructed above.
Test: Send an email from one internal mailbox to another internal mailbox.
Expected result:
Email is delivered normally
No duplicates
No spam filtering issues
Tracking appears in Trustifi Sent Emails
Test 3: Sending to both internal and external recipients
Preconditions: Outbound Email Relay integration completed.
Test: Send a single email to at least two recipients, one internal and one external.
Expected result:
All recipients receive the message normally
No delays or duplicates
Email is not flagged as spam
Sender can view tracking for all recipients in Trustifi